Thursday, September 27, 2012
Sunday, September 9, 2012
New Cayman Dive and Snorkel Site - iDive
I came across a few posts promoting this new "social" dive and snorkel site for Cayman. It has great hi-quality video and briefly outlines some of the dive and snorkel sites on Grand Cayman. Currently the site is more dive-centric than snorkel focused (what else in new), but looks like it it has the potential to grow into a very useful resource. Definitely worth checking out.
Friday, August 10, 2012
GROUPER MOON
The wonderful and informative PBS series Changing Seas recently featured the REEF organization's "Grouper Moon" documentary on the Nassau Grouper spawning aggregation site off Little Cayman.
You can learn more about the Grouper Moon Project at the REEF's website.
You can learn more about the Grouper Moon Project at the REEF's website.
Watch Grouper Moon on PBS. See more from Changing Seas.
Saturday, June 16, 2012
SNORKELING PICTURE TAKING TIPS AND ADVICE
SNORKELING PICTURE TAKING TIPS AND ADVICE
A common question asked on the Snorkel Blog is what type of camera and underwater set-up I use for taking pictures when snorkeling. Folks are usually surprised when told I use a simple underwater point and shoot with no added equipment. You can take stunning underwater shots just by being armed with a little bit of knowledge and understanding of some basic photography principles. If I can do it, anyone can.My gear to date has included:
- Pentax Optio W80 - Easy to use, decent underwater pictures, below par above water image quality, extremely low ISO settings, poor software based image stabilization and short battery life. (Model Discontinued)
- Canon PowerShot D10 - Great optics for sharp pictures, easy to use, but seals are prone to leakage and flooding. Great lens based image stabilization. (Model Discontinued)
- Olympus TG-820 ihs - Emergency purchase when a Canon D10 flooded, good picture quality, large sensor for low light situations, but menu navigation is sub-par (stupid thumb joystick-like control) and image quality tends to be on the softer side. Image stabilization not as good as Canon's.
- Olympus TG-1 - This is my current camera and has been for a few years. Durable, double locking seals and great underwater image quality. A few generations old now, but still a keeper. Highly recommend the TG-"X" line.
- Camera Settings - Try not to use the zoom, definitely do not use any digital zoom. Images taken with the zoom feature tend to lose detail and often blur underwater. Instead, crop your images when post processing, to position your subject(s) and pull closer in during post processing for better results. Higher ISO settings tend to introduce more noise and "snow" into pictures. If possible limit the ISO setting to 100 or lower, certainly no higher than 200. The trade-off with a lower ISO setting is the that images can easily get blurred with a less than steady hand. Most image stabilization features in the better point and shoots can greatly minimize this issue. Notice the lack of sharpness on the Barracuda image taken with the lens zoomed.

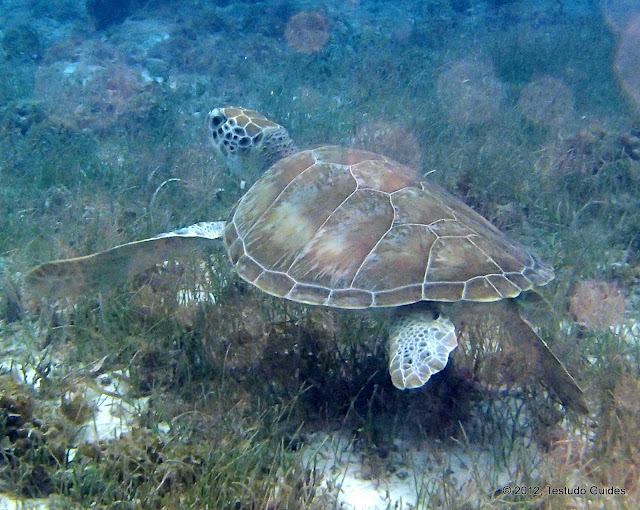
- Natural light is your friend. There really is no need for use of flash or strobes at snorkeling depths. The flash usually only ends up highlighting the particulates in the water and creating picture ruining "snow", known as backscatter. With the sun is overhead and the seafloor evenly lit, midday snorkels in the Caribbean usually lend themselves to the best all around lighting conditions. Notice the vibrancy of color on the Striped Parrotfish and the Anemone with the natural sunlight versus the "blobs" of particulates highlighted by the firing of the flash in the Green Turtle image.

- Taking "top down" photos usually doesn't translate into interesting compositions. You need to dive down to get level with you subjects. You may know what the shot looked like in real life, but anyone else looking at the image probably won't get the same visual you had taking it. That giant French Angelfish you were doggedly stalking usually turns out to look like a part of the scenery, while a Conch Shell becomes a stunning feature.
Use of a weight belt to help maintain neutral buoyancy, even in shallow water is a great advantage. If you don't have one, dive down (even if just a few feet) and grab hold of a ROCK, not coral, to anchor yourself for a few seconds in order to capture a shot.


- Know your light source (i.e. the Sun) and use it to your advantage, as either spot lighting to highlight your subjects or as backlighting to set the "mood" of a composition. It takes practice, but learning how to use the changing angles of the Sun's rays can make or break a shot. Morning light differs from midday light and evening light. Composing images under the varying daylights can really add atmosphere and convey a sense of place. Other than getting level with your subject, I find this skill is next most important in mastering. Midday sun illuminates a Lionfish and late afternoon sun back-lights some Chubs.
- Panoramic compositions are tough due to particulates in the water, usually making depth visibility look less than in real life. The deeper in the water column, the better the chance to get a clearer looking visual and a more lifelike seascape. To capture the sense of breath and scope in terrain shots, the inclusion of reference subjects in the composition help connote scale. The blue haze in wide angle shots is almost impossible to avoid when shooting from the surface, but when taken lower in the water column the image becomes much more clear. The inclusion of the Gorgonians in the foreground help set the scale of the boulder coral in the background.


- Choosing how to frame your shot is also important. I make multiple passes from various angles on my intended subject to determine where the "right" shot needs to come from. While not always possible due to unpredictable nature of many subjects, your odds of scoring a money shot greatly increase with the amount of shots you can take.


- Post processing is critical. Even cameras with underwater modes and settings can still produce images that flare blue or green; or simply develop too dark or murky looking. Image Optimization programs or features can save many a picture and turn good shots into great ones. I use Google's Picasa "I'm Felling Lucky" fix all solution. Reliably gets rid of any back-scatter and blue haze, plus is super easy to use. Photoscape is my go to for the tough images that may be too blue or green. Both are free. The various Adobe products also have top "fixes" options.


- Cropping to remove extraneous visual clutter in a composition, adds intimacy and helps focus the eye onto your true subject. That turtle you were "right next too" is probably going to look like he was football field away in your initial image. Cropping and zooming with your post processing software can usually make him look like he was at least involved in the same play from scrimmage with you. The basic composition tenant, the Rule of Thirds, is also something to keep in mind when cropping you images.

Down Load or Print Version Here
Subscribe to:
Posts (Atom)